Step 2: Remove the Old Hardware
Take off the original drawer pull or handle.
Keep the hardware if you like it—you may be able to reuse it.
If you want a completely different appearance, remove it and save the screws separately.
Once the hardware is removed, inspect the holes.
If they’re damaged or you don’t intend to reuse them, fill them with wood filler.
Allow the filler to dry completely before sanding.
Step 3: Clean the Drawer Thoroughly
Before sanding or painting, clean the drawer.
Remove:
- Dust
- Dirt
- Cobwebs
- Old adhesive
- Loose paint
- Grease
- Debris
Pay particular attention to corners and joints.
The cleaner the surface, the better your new finish will look.
If the drawer has a musty smell, don’t simply cover it with paint. Determine whether moisture or mildew is responsible and address that problem first. Moisture control and good ventilation are important when dealing with old wooden furniture.
Step 4: Sand Everything
This is one of the most important steps.
Run your hand carefully over the entire drawer.
If you feel:
- Splinters
- Sharp corners
- Rough wood
- Peeling finish
- Protruding staples
- Loose pieces
deal with them before continuing.
Use medium-grit sandpaper first and then finish with finer sandpaper.
You don’t necessarily need to remove every trace of the original finish. The goal is to create a smooth, safe surface and give the new paint something to adhere to.
For pet furniture, pay particular attention to edges that your dog or cat could rub against.
A Zero Waste Scotland tutorial specifically recommends sanding the edges of an old drawer to remove splinters before converting it into a pet bed.
Step 5: Repair Any Damage
Now inspect the drawer again.
If you find small cracks or holes, use wood filler.
For loose joints, use suitable wood glue and allow it to cure fully.
Don’t proceed with a drawer that’s structurally weak.
Remember: once your pet climbs onto the finished bed, the drawer will experience movement and weight. The four legs also create leverage against the drawer bottom, so the structure needs to be strong.
Step 6: Decide Whether You Need an Entrance
This is an optional step.
Some drawers can be used exactly as they are.
Others have a relatively high front panel that could make getting in and out difficult for a small, elderly, or mobility-limited pet.
One established upcycling guide recommends cutting a small access opening into the front of the drawer when necessary, while keeping enough material around the opening to preserve the drawer’s strength.
If you make an opening:
- Measure the front panel.
- Mark the center.
- Draw the opening.
- Make sure the opening is large enough for the pet.
- Leave sufficient wood around the opening.
- Carefully cut the shape.
- Sand every edge thoroughly.
Never leave a freshly cut edge exposed.
Step 7: Attach the Legs
Now comes the transformation that makes the project look completely different.
Turn the drawer upside down.
Position four furniture legs near the corners.
The exact mounting method depends on the type of legs you purchase.
Some furniture feet screw directly into mounting plates, while others attach directly through the drawer bottom.
A good general process is:
- Measure and mark the position of each leg.
- Make sure all four positions are symmetrical.
- Drill appropriate pilot holes.
- Install the mounting plates if your legs require them.
- Attach the legs.
- Tighten everything securely.
- Turn the bed upright.
- Check for wobbling.
Some published drawer-bed designs attach four furniture feet directly through the drawer bottom, while others use dedicated leg plates for a sturdier connection.
Don’t make the legs unnecessarily tall
The goal isn’t to turn the pet bed into a table.
A relatively low bed is generally easier for a pet to access, particularly for older animals or animals with mobility problems.
Step 8: Give It a New Color
This is where you can really make the project your own.
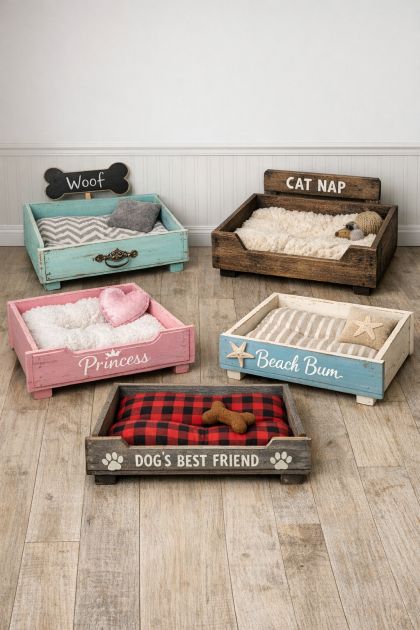
The beds in the image demonstrate several different styles:
Turquoise
Perfect for a coastal or farmhouse-inspired room.
Pink
A fun choice for a playful “Princess” bed.
Dark brown
Excellent for a rustic or traditional interior.
Natural wood
Ideal if you want to emphasize the character of the original drawer.
Black or charcoal
Works beautifully in modern interiors.
White
A classic option that can make an old drawer look surprisingly elegant.
You can use paint, stain, or another appropriate furniture finish depending on the material and the look you’re after.
Apply thin, even coats rather than one very thick coat.
Allow each coat to dry according to the manufacturer’s instructions.
Step 9: Add a Protective Finish
Once the paint or stain has completely dried, consider applying an appropriate protective finish.
This is especially useful because pet beds experience:
- Scratching
- Hair
- Dirt
- Occasional spills
- Cleaning
- General wear
A furniture wax or suitable clear finish can help protect the surface, depending on the paint and material you’ve chosen. One documented drawer-bed project used furniture wax to finish areas expected to experience wear.
Make sure the finish is fully cured according to its manufacturer’s instructions before allowing your pet to use the bed.
Dry to the touch doesn’t necessarily mean fully cured.
Step 10: Add the Decorative Hardware
Now bring back the “dresser” character.
Install a decorative handle on the front.
You could use:
- A vintage drawer pull
- Ceramic knob
- Brass handle
- Black metal handle
- Rope handle
- Wooden knob
The hardware can completely change the appearance.
For example, a turquoise drawer with a distressed brass pull can create a vintage farmhouse look, while black hardware on natural wood gives the bed a more modern appearance.
Step 11: Personalize It
This is one of my favorite parts of the project.
Instead of simply making a pet bed, turn it into your pet’s own piece of furniture.
You could add:
“WOOf”
For a classic dog bed.
“CAT NAP”
Perfect for a feline sleeping spot.
“PRINCESS”
Great for a playful pink design.
“BEACH BUM”
Perfect for a coastal-themed room.
Or simply add your pet’s name.
You can use:
- Stencils
- Vinyl lettering
- Wooden letters
- Hand-painted lettering
- Small metal plaques
The personalization is what makes these beds look like intentional furniture rather than an old drawer that has been given a second life.
Step 12: Make the Cushion
Now measure the inside dimensions of the drawer.
Measure:
- Length
- Width
- Available depth
Then choose a cushion that fits comfortably.
Ideally, the cushion should fill most of the sleeping surface without being so large that it becomes difficult to place inside.
One DIY creator made a cushion specifically to fit a repurposed drawer, while another project simply used a standard pillow with a fabric cover.
For an easy version
You can simply use:
A washable pillow + a decorative pillowcase.
That’s it.
You don’t necessarily need to sew a complicated pet mattress.
Step 13: Add a Washable Cover
This is particularly important for dogs and cats.
Pets bring dirt, hair, and sometimes moisture into their beds.
Choose a removable cover that can be washed regularly.
You can also place a thin washable blanket over the cushion.
This allows you to refresh the bed without rebuilding anything.
Step 14: Add a Non-Slip Base
If the finished bed slides across smooth flooring, add a non-slip material underneath.
This can be particularly useful on:
- Tile
- Hardwood
- Laminate
- Smooth concrete
The bed should remain stable when your pet jumps in, turns around, or gets out.
Step 15: Test the Bed Before Your Pet Uses It
Don’t immediately place your pet inside.
First, inspect everything yourself.
Check:
- Are the legs firmly attached?
- Does the drawer wobble?
- Are there sharp edges?
- Are there exposed screws?
- Are there splinters?
- Is the paint completely cured?
- Is the cushion secure?
- Is the bed stable on the floor?
Push down on each corner.
Move the bed gently from side to side.
If anything feels loose, fix it before introducing your pet.
Step 16: Let Your Pet Discover It
Finally, put the bed somewhere your pet already enjoys spending time.
Add the cushion and perhaps a familiar blanket or toy.
Don’t force your pet into it.
Some animals will immediately jump inside.
Others may investigate it for several days before deciding that it is their new favorite sleeping spot.
The goal is to make the bed comfortable enough that your pet naturally chooses it.
Different Styles You Can Create
The beauty of this project is that one basic idea can produce dozens of completely different designs.
Rustic Farmhouse Bed
Use:
- Distressed white paint
- Natural wood
- Black metal hardware
- Neutral cushion
Add a small wooden sign with your pet’s name.
Coastal Pet Bed
Use:
- Pale blue
- White
- Beige
- Rope
- Starfish-inspired decorations
The “Beach Bum” style shown in the image is a great example of this concept.
Princess Bed
Choose:
- Pink paint
- Soft white cushion
- Decorative lettering
- Small wooden feet
This would make an adorable bed for a small dog or cat.
Industrial Style
Try:
- Dark gray or black paint
- Metal legs
- Black hardware
- Neutral cushion
This works particularly well in modern interiors.
Natural Wood Bed
Skip the paint altogether.
Sand the drawer, repair it, apply an appropriate wood finish, add wooden legs, and place a simple neutral cushion inside.
This lets the original character of the furniture remain visible.
Don’t Have an Old Dresser?
That’s okay.
You can often find unwanted drawers through:
- Secondhand furniture shops
- Furniture reuse centers
- Online local listings
- Friends and family
- Garage sales
- Furniture being discarded during renovations
You don’t even need the entire dresser.
Sometimes people give away individual drawers after disposing of the main furniture.
And because the drawer is already essentially a wooden box, it can save considerable construction time compared with building the entire structure yourself.
Other Things You Can Make From Old Drawers
Don’t stop at pet beds.
Old drawers can also become:
- Wall shelves
- Under-bed storage
- Planter boxes
- Display shelves
- Side tables
- Bathroom organizers
- Entryway organizers
- Book storage
- Toy storage
Old House Journal, for example, has highlighted vintage dresser drawers being transformed into pet beds and other useful furniture projects.
So the next time you see an old dresser headed for the trash, look at the drawers before throwing them away.
A Few Important Safety Tips
Because this project is intended for an animal, safety should come before appearance.
Avoid drawers with serious mold, rot, severe structural damage, or unknown chemical contamination.
Remove or secure any protruding nails, staples, screws, or hardware.
Sand every exposed edge.
Don’t use a drawer that’s too small for the animal.
Don’t make an entrance so large that it compromises the drawer’s structural strength.
Make sure the legs are securely attached.
Use appropriate hardware for the thickness and material of the drawer.
Allow paints, stains, adhesives, and protective finishes to cure completely according to their product instructions before your pet uses the bed.
And regularly inspect the finished bed. If a leg becomes loose or the wood begins to crack, repair it immediately.
The Best Part: You’re Not Just Making a Pet Bed
You’re taking something that was headed for the trash and turning it into something useful, personal, and attractive.
A dresser drawer that once held socks, shirts, or blankets can become the place where your dog sleeps every afternoon.
A forgotten piece of furniture can become a cozy cat bed.
And instead of buying a generic pet bed that looks exactly like thousands of others, you can create something that matches your home and reflects your pet’s personality.
All it takes is an old drawer, four legs, a little hardware, some paint, and a comfortable cushion.
So before you throw away that old dresser, pull out the drawers and take another look.
You may already have the beginnings of an adorable custom pet bed sitting right in front of you.
Vous n’avez plus de pièces jointes pour le moment. Lancez u