⚫ Step 2: Prepare the round metal screen
Clean the grease-splatter screen thoroughly before turning it into décor.
Even if it’s new, wipe it down to remove dust or manufacturing residue.
If you’re using a previously used kitchen splatter screen, wash and degrease it extremely well.
Let it dry completely.
This matters because glue doesn’t adhere well to greasy surfaces.
Inspect the edges carefully, too.
Some metal screens can have sharp edges or exposed wire. Cover or smooth anything that could scratch your hand or damage the door.
🌻 Step 3: Decide where your first “petal” goes
Don’t immediately start gluing everything.
Instead, lay the screen flat and arrange several dusters around the outer edge.
You’re trying to create an even circle.
Think of the wreath as a clock.
Place your first duster around the 12 o’clock position.
Then position another around 1 o’clock.
Continue around the circle.
This gives you a visual guide before you permanently attach anything.
🧩 Step 4: Test the spacing
This is where patience pays off.
Place the yellow dusters around the perimeter without glue.
Ask yourself:
Are there gaps?
If you can see large sections of the black frame between the yellow pieces, you’ll need to move them closer together.
The goal is to create a dense ring.
A good sunflower has overlapping petals rather than perfectly separated ones.
Other wreath-making tutorials similarly emphasize spacing and fullness; tighter placement generally produces a fuller-looking wreath.
🔥 Step 5: Start gluing
Now it’s time for the hot glue.
Apply glue to the part of the duster that will contact the metal frame.
Press it firmly against the screen.
Hold it in position until the glue sets.
Then move to the next one.
Important:
Don’t put your fingers directly into fresh hot glue.
Use a craft stick, silicone finger protector, tweezers, or another suitable tool when necessary.
Hot glue can cause serious burns even though it looks harmless.
🌼 Step 6: Build the outer layer first
Start with the outside circumference.
This creates the recognizable sunflower silhouette.
Work gradually around the circle rather than randomly placing dusters.
A good pattern is:
attach → check spacing → attach → check spacing → continue
Every few pieces, step back and look at the wreath from a distance.
You’ll often notice uneven areas that aren’t obvious when you’re working close up.
🟨 Step 7: Create the fluffy petal effect
Here’s the secret to making the finished wreath look expensive:
Don’t flatten the dusters.
Allow them to retain their natural fluffiness.
After the glue has cooled, gently separate the fibers.
Fluffing is also a standard finishing step in many sunflower wreath projects because it helps create a fuller, more dimensional appearance.
You want the yellow material to project outward.
Think of the goal as creating layers of soft petals rather than a flat ring.
🖤 Step 8: Make the sunflower center stand out
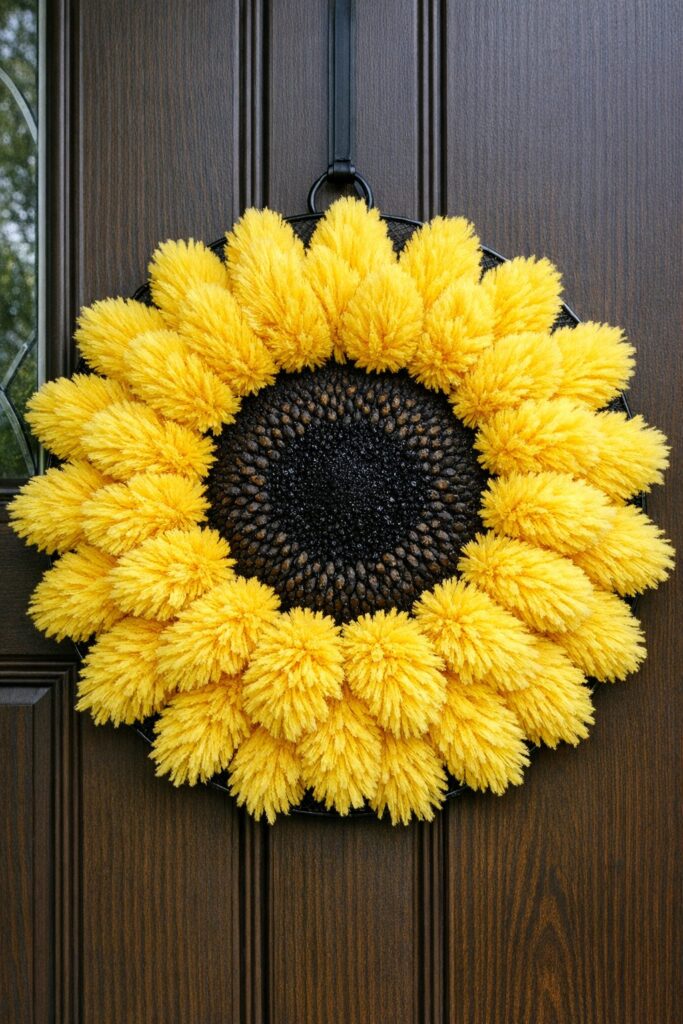
The image has a particularly effective contrast:
bright yellow petals + very dark center.
That contrast is what makes the design immediately recognizable.
If your splatter screen already has a black center, you may not need to do much.
But if the center looks too plain, you can decorate it.
Option 1: Black felt
Cut a circle slightly smaller than the inner opening.
Attach it to the back or center area.
Option 2: Brown burlap
This creates a warmer, rustic appearance.
Option 3: Faux sunflower seeds
Small black or brown decorative beads can create a realistic seed-head effect.
Option 4: Rope
Dark rope arranged in concentric circles can create a textured sunflower center.
Rope and burlap have both been used successfully in other DIY sunflower wreath designs.
🟤 Step 9: Add depth to the center
Don’t worry about making the center perfectly flat.
A little dimension can actually make the wreath look more realistic.
You can layer dark fabric or burlap so the center sits slightly behind the yellow petals.
The yellow dusters should overlap the edge of the center slightly.
This hides the transition and makes the petals appear to grow naturally from the middle.
🪢 Step 10: Check the hanging mechanism
Before putting the wreath on your front door, make sure the hanging point is secure.
The original metal screen may already have a handle or hanging ring.
If not, add a sturdy loop using:
- Floral wire
- Strong cord
- Ribbon
- Heavy-duty twine
Don’t rely solely on a thin decorative ribbon if the finished wreath becomes heavy.
🚪 Step 11: Protect your front door
This is an easy step to overlook.
The back of the metal screen could potentially scratch painted, stained or finished doors.
Add a protective layer to the rear if necessary.
You could use:
- Felt pads
- Soft fabric
- Foam strips
- Felt circles
- A thin piece of cardboard covered with fabric
The goal is to prevent metal from rubbing directly against the door.
Some traditional wreath tutorials similarly recommend adding a backing to protect the door surface.
🌦️ Can you leave it outside?
This is where you need to be careful.
The image shows the wreath on a front door, but not every yellow duster or adhesive is designed for outdoor exposure.
Rain, humidity, sunlight and temperature changes can cause:
- Fading
- Adhesive failure
- Material deterioration
- Rust on untreated metal
- Loss of fluffiness
If your front door is completely exposed to rain and strong sun, this project may not last as long as it would under a covered porch.
For outdoor décor, use materials specifically rated for outdoor use whenever possible.
Some other sunflower wreath tutorials explicitly recommend keeping certain materials under a covered area or behind a screen door to protect them from the elements.
☀️ A great place for this wreath
This design works particularly well for:
Spring
Bright yellow gives the entrance a cheerful seasonal look.
Summer
The sunflower theme fits naturally with warm-weather décor.
Early fall
Yellow and brown pair beautifully with autumn decorations.
Country or farmhouse décor
The combination of rustic black metal and bright yellow works particularly well with farmhouse-style entrances.
🎀 Want to make it look even better?
Once the basic sunflower is complete, you can customize it.
Add a bow
A black-and-white buffalo-check ribbon would create a classic farmhouse look.
Add greenery
Artificial leaves tucked behind the yellow petals can make the flower look more botanical.
Add a small welcome sign
A wooden “WELCOME” sign can be attached near the bottom.
Add a bee
A small artificial bee is a fun finishing detail.
Add a seasonal message
For example:
HELLO SUNSHINE
or
WELCOME
or simply
HOME
Don’t overcrowd the design, though.
The giant sunflower is already the star.
📏 How many dusters do you actually need?
The 50-duster figure should be treated as a rough guide rather than a universal requirement.
The actual number depends on:
- Diameter of your screen
- Size of each duster
- How densely you arrange them
- How much overlap you want
- How fluffy the individual dusters are
A smaller screen could require considerably fewer.
A large screen with very dense petals could require more.
The easiest way to calculate it
Place the dusters around the circumference without glue.
Count how many fit comfortably.
Then add approximately 10–15% extra for adjustments, damaged pieces or areas where you want additional fullness.
💡 The biggest mistake to avoid
Don’t glue all 50 pieces immediately.
This is probably the easiest way to end up with an uneven wreath.
Instead:
First
Arrange everything.
Second
Take a photograph.
Third
Look for gaps.
Fourth
Adjust the spacing.
Fifth
Only then start gluing.
It’s much easier to fix an arrangement when nothing is permanently attached.
🧼 What happens if the dusters get dirty?
Because you’re using cleaning dusters as decorative petals, they’re naturally prone to collecting dust.
Fortunately, the design can usually be maintained with gentle cleaning.
Try:
- Shaking the wreath outdoors
- Using a gentle stream of air
- Lightly brushing the fibers
- Carefully vacuuming with a soft attachment
Avoid soaking the entire wreath unless you know the materials and adhesive can tolerate water.
🔥 Is hot glue enough?
For an indoor wreath, hot glue may be perfectly adequate.
For an outdoor wreath, however, don’t automatically assume that ordinary hot glue will withstand months of weather exposure.
Temperature extremes can affect adhesive performance.
If you’re making a permanent outdoor decoration, consider an adhesive specifically intended for the materials and environmental conditions you’re working with.
And remember: test a small section first.
💵 Why this DIY is so satisfying
What makes this project particularly appealing isn’t simply that it’s inexpensive.
It’s the transformation.
You’re taking something designed for one purpose—a kitchen grease-splatter screen—and turning it into something completely different.
You’re taking something associated with cleaning—a fluffy duster—and turning it into a decorative flower petal.
That’s the essence of a good upcycling project:
ordinary objects + imagination = something surprisingly beautiful.
And sunflower wreaths are especially forgiving because the petals don’t need to be perfectly identical. Other DIY sunflower designs deliberately use different materials and layered techniques to create fullness and texture.
🌻 The complete DIY at a glance
Materials
- 1 round black metal splatter screen
- About 50 yellow fluffy dusters
- Hot-glue gun
- Plenty of glue sticks
- Dark felt, burlap or fabric for the center
- Strong hanging loop
- Optional ribbon
- Optional greenery
- Optional protective backing
Instructions
1. Clean the metal screen.
2. Check for sharp edges.
3. Arrange the yellow dusters around the outside.
4. Adjust spacing until the circle looks full.
5. Glue the first layer around the perimeter.
6. Continue around the entire screen.
7. Add additional dusters where gaps remain.
8. Fluff the yellow fibers.
9. Decorate the center with black or brown material if needed.
10. Add a secure hanging loop.
11. Protect the back of the wreath from scratching the door.
12. Add optional ribbon, greenery or a welcome sign.
13. Hang it and step back to admire your oversized sunflower.
🌞 The final result
The beauty of this hack is that it doesn’t require professional wreath-making skills.
You don’t need to know how to weave mesh.
You don’t need to construct complicated floral arrangements.
You don’t even need to start with a conventional wreath form.
You’re essentially creating a giant sunflower one fluffy yellow petal at a time.
And that’s why the idea is so clever: the unusual materials do most of the visual work for you.
The black circular base becomes the sunflower’s center, while the bright yellow dusters create a soft, oversized ring of petals.
A kitchen splatter screen goes in as an ordinary household object—and comes out as cheerful front-door décor.
If you want the fullest, most polished result, remember three things:
Use enough yellow material, keep the spacing consistent, and don’t be afraid to fluff the petals once everything is attached.
That’s what turns this from a collection of dollar-store supplies into a spectacular sunflower wreath. 🌻