Step 1: Choose the Right Board
Start with a sturdy wooden cutting board.
It doesn’t have to be perfect. In fact, an older board with a little character can make the finished organizer look even better.
Look for a board that is:
- Thick enough to accept screws
- Wide enough for your jars
- Not cracked or severely damaged
- Large enough to accommodate the number of containers you want
If the board has rough edges or old stains, sand it thoroughly before continuing.
Don’t have an old cutting board?
A wooden serving board, reclaimed wood panel, or appropriately sized hardwood plank can work just as well.
Step 2: Prepare the Jars
Glass food jars are perfect for this project.
You can recycle jars that previously contained:
- Pasta sauce
- Pickles
- Jam
- Vegetables
- Sauces
- Canned foods
Wash them thoroughly and remove any labels.
Check each jar for chips or cracks. Don’t use damaged glass, especially if the jars will hold heavy utensils.
The number of jars is completely up to you.
Four jars create a compact organizer like the example, while six or eight can provide considerably more storage.
Step 3: Arrange the Jars Before Drilling
This is an important step.
Don’t start drilling immediately.
Place the jars and their mounting rings on the board and experiment with different arrangements.
You could create:
A two-by-two arrangement
Perfect for a small kitchen.
A vertical arrangement
Useful if you have a narrow wall.
Three or more rows
Better for a large collection of kitchen tools.
Leave enough space between the containers so that you can easily remove utensils without hitting neighboring jars.
Once you’re happy with the arrangement, mark the positions with a pencil.
Step 4: Attach the Jar Rings or Lids
This is where the project gets interesting.
The metal rings/lids become the mounting mechanism that holds the jars against the wooden board.
Position each ring carefully and mark the screw holes.
Drill small pilot holes into the wood before inserting the screws.
Why use pilot holes?
Pilot holes help prevent the wood from splitting and make it easier to drive the screws straight.
Use screws that are appropriate for the thickness of your board.
Important: The screw should be long enough to hold the hardware securely but not so long that it comes through the front of the board.
Step 5: Secure Everything Firmly
Once the pilot holes are made, attach the jar rings to the board.
Use washers if necessary to distribute pressure around the mounting points.
Before placing anything inside the jars, gently test each attachment.
The jars shouldn’t wobble excessively.
This is especially important because kitchen utensils can become surprisingly heavy when several are stored together.
Step 6: Finish the Wood
If you’re using an old cutting board, you can leave it rustic—or give it a completely new appearance.
For a rustic look
Lightly sand the surface and apply a food-safe wood oil or suitable finish.
For a darker appearance
Use an appropriate wood stain followed by a protective finish.
For a modern look
Sand the board smooth and use a clear finish that allows the natural grain to remain visible.
The wood-and-glass combination works particularly well because it gives the organizer a warm farmhouse or rustic-kitchen appearance.
Step 7: Install the Organizer
You can use this organizer in several ways.
On the countertop
Simply place the finished board against a wall or backsplash.
This is the easiest option and doesn’t require wall installation.
Mounted on the wall
If you want to save even more counter space, attach the board securely to the wall using appropriate mounting hardware.
Important: Because the organizer becomes heavier when the jars are filled, don’t rely on weak adhesive strips. Use hardware appropriate for the wall type and the total weight.
Step 8: Organize the Utensils
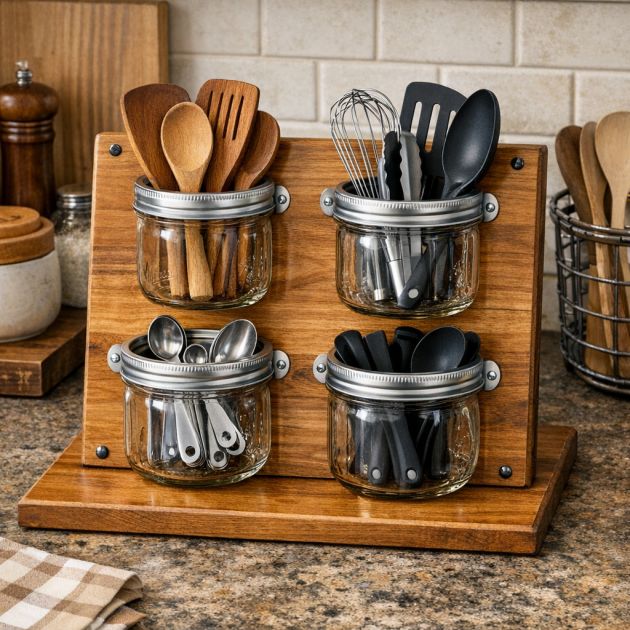
Now comes the satisfying part.
Give each jar a purpose.
For example:
Jar 1: Wooden spoons and spatulas
Jar 2: Whisks and cooking utensils
Jar 3: Measuring spoons
Jar 4: Serving spoons and smaller tools
You can customize the arrangement according to the way you cook.
If you bake frequently, dedicate one jar to baking tools.
If you prepare coffee frequently, another jar could hold coffee spoons and small accessories.
A Simple Upgrade: Add Labels
If several jars contain similar items, small labels can make the system even more useful.
You could label them:
- COOK
- BAKE
- SERVE
- MEASURE
Or use more traditional labels such as:
- Spoons
- Spatulas
- Baking
- Measuring
For a rustic appearance, handwritten labels or small wooden tags look particularly attractive.
Another Great Idea: Add Hooks
Don’t stop with the jars.
You can add a few small hooks to the bottom or side of the board.
They can hold:
- Measuring cups
- Scissors
- Kitchen towels
- Oven mitts
- Small brushes
- Wooden utensils with hanging holes
This turns the cutting board into a multi-purpose kitchen command center.
Why This DIY Is Better Than Buying Another Organizer
One of the biggest advantages of this project is customization.
A store-bought organizer comes with a fixed size and layout.
With this DIY, you decide everything.
You control:
- The number of jars
- The spacing
- The size of the board
- The finish
- The colors
- The labels
- The location
- The types of utensils stored
And because you’re reusing old materials, the project can also be inexpensive.
Safety Tips You Shouldn’t Ignore
Although this is a simple DIY project, there are a few things worth keeping in mind.
Use sturdy glass
Never use jars with cracks, chips, or damaged rims.
Secure the board properly
If you mount it to a wall, make sure the mounting hardware is suitable for the wall and the loaded weight.
Don’t overload the jars
A jar filled with heavy metal utensils can put significant stress on the mounting hardware.
Protect the wood
If the organizer will be near the sink, protect the wood against repeated exposure to water.
Be careful when drilling
Wear appropriate eye protection and secure the board before drilling.
How to Make It Even More Beautiful
The basic concept can be adapted to almost any kitchen style.
Farmhouse style
Use reclaimed wood, clear glass jars, and simple handwritten labels.
Modern style
Use a dark-stained board and identical minimalist jars.
Scandinavian style
Keep the wood light and use simple glass containers.
Industrial style
Combine dark wood with black metal hardware.
Cottage style
Paint the board in a soft color and add decorative labels.
The Best Part: You Can Reuse Materials
What makes this project especially appealing is its sustainability.
Instead of throwing away an old cutting board or empty food jars, you’re giving them a completely new purpose.
A few ordinary household objects become a useful piece of kitchen organization.
That’s the beauty of DIY:
You don’t always need to buy something new to improve your home. Sometimes you just need to look at an old object differently.
Final Thoughts
This clever cutting-board-and-jar organizer proves that practical storage doesn’t have to be expensive or complicated.
With an old wooden board, a few recycled jars, some basic hardware, and a little creativity, you can create a beautiful custom utensil organizer that saves counter space and keeps your kitchen tools within easy reach.
And once your friends and family see it, don’t be surprised if they start asking:
“Where did you buy that?”
The best answer?
“I made it myself.”