Step 1: Gather Your Old Keys
Start by collecting all the unused keys you can find.
The more variety you have, the more interesting the finished decoration will look. Small keys, large keys, rounded heads, square heads, modern keys, and older worn keys can all be used together.
For this particular idea, aim for around 40 keys.
You do not need every key to match. In fact, the differences in shape will make the final hanging display look more organic and artistic.
Before painting, sort through them and remove anything you do not want to use.
You may also want to separate unusually large or decorative keys. These can be used as focal points near the center or at the bottom of longer strands.
Step 2: Clean the Keys
Before applying paint, make sure the keys are clean and dry.
Old keys can collect grease, dust, dirt, and residue over the years. Wipe each one carefully with a cloth and a suitable cleaner or degreaser.
If some keys have rough surfaces, light sanding can help prepare them for painting.
Then allow everything to dry completely.
This preparation step may seem small, but it can make a big difference in how evenly the paint covers the metal.
Step 3: Give Every Key a Brilliant Copper Makeover
Now comes the transformation.
Lay the keys on a protected surface in a well-ventilated area and apply a light coat of bright copper spray paint.
Do not try to cover everything with one heavy coat.
Instead:
- Apply a light, even coat.
- Allow it to dry according to the product instructions.
- Turn the keys over.
- Paint the opposite side.
- Add additional light coats if needed.
Soon, those dull silver and rusty keys begin to look like a coordinated collection of tiny copper ornaments.
The metallic color is especially effective because it reflects light and stands out beautifully against the dark browns and greens commonly found outdoors.
For an outdoor project, a suitable protective clear finish can also help preserve the decorative surface over time.
Step 4: Choose the Perfect Piece of Driftwood
The branch is more than just a support.
It is part of the design.
Look for a thick, sturdy piece of driftwood or a naturally weathered branch with plenty of character. Cracks, curves, knots, and rough bark can actually make it look better.
The natural imperfections create a beautiful contrast with the smooth metallic finish of the painted keys.
Make sure the wood is strong enough to support the combined weight of all the hanging keys.
If you collected the branch yourself, clean it carefully and allow it to dry before starting the project.
You can leave the wood completely natural for a rustic appearance or lightly sand it if you prefer a smoother finish.
Step 5: Cut the Twine into Different Lengths
This is where the design starts to come alive.
Instead of making every key hang at exactly the same height, cut your jute twine into a variety of lengths.
For example, you might create:
- Short strands
- Medium-length strands
- Long strands
- A few extra-long centerpiece strands
This creates a cascading effect, similar to a curtain or chandelier.
Varying the lengths also allows the keys to move independently when the wind blows. DIY key chime projects commonly use staggered hanging strands so the metal pieces can move and interact rather than remaining in one rigid line.
Step 6: Tie a Key onto Each Strand
Thread one end of the twine through the hole at the top of each key.
Tie a secure double knot.
For additional security, you can add a second knot above the key or use a small metal ring as a connector.
Repeat the process until all 40 keys have their own hanging strand.
You can also experiment with the arrangement.
For example:
- Place larger keys on longer strands.
- Mix small and large keys throughout the display.
- Create a fuller cluster in the center.
- Leave slightly more space near the outer edges.
- Use one large key as the lowest hanging centerpiece.
There is no strict pattern required.
The beauty of this project comes from the slightly imperfect, handmade appearance.
Step 7: Attach the Key Strands to the Driftwood
Once all the keys are attached to their cords, begin tying the strands onto the driftwood.
You can simply wrap and knot the twine securely around the branch.
Space the strands across the length of the wood.
For a fuller look, place some strands closer together and allow others to hang slightly farther apart.
You can arrange them in a gentle curve, creating a fuller cluster in the middle and shorter groups toward the ends.
If you want a more structured design, you can mark the attachment points before tying everything in place.
A drill can also be used to create attachment holes if you prefer, although wrapping and knotting the twine around a textured branch can create an especially rustic look.
Step 8: Create a Strong Hanging Support
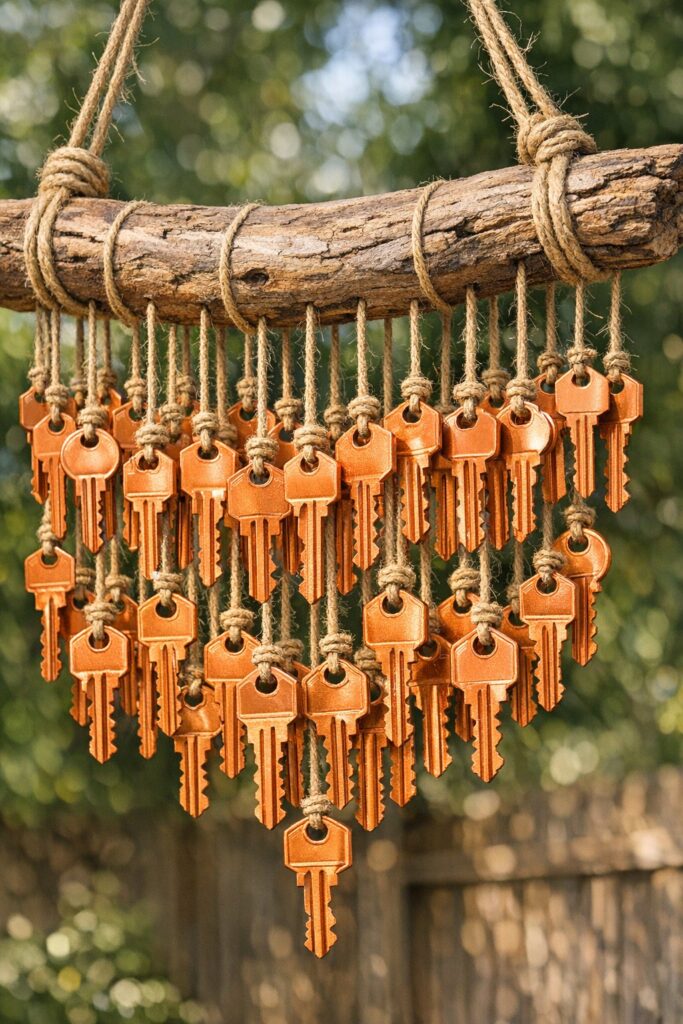
Because the finished decoration contains around 40 metal keys, it may become surprisingly heavy.
Use a thicker, stronger piece of cord to create the main hanging support.
Attach one end near each side of the driftwood and tie the two ends together above the branch.
Before hanging the finished piece outdoors, test it somewhere safe and make sure:
- The knots are secure.
- The driftwood can support the weight.
- None of the keys can easily fall off.
- The hanging support is strong enough for the finished decoration.
Once everything is secure, your recycled key creation is ready to display.
Where Should You Hang It?
This project can work almost anywhere outdoors.
On a Covered Porch
Hang it near the entrance where visitors can immediately notice the unusual copper display.
From a Pergola
The natural wood blends beautifully with other wooden outdoor structures.
In the Garden
Suspend it from a sturdy tree branch or garden hook where the keys can move gently with the breeze.
Near an Outdoor Seating Area
It can become an unexpected conversation piece above a bench or patio chair.
By a Window
The copper keys can catch the sunlight while the movement adds visual interest to the view.
For longer-lasting outdoor use, placing handmade chimes in a somewhat sheltered location can help reduce exposure to heavy rain and harsh weather.
Why the Copper Color Makes Such a Difference
You could absolutely leave the keys in their original condition.
A collection of silver, brass, rusty, and worn keys would create a more vintage appearance.
But painting them all the same bright copper color creates a completely different effect.
The color brings all the mismatched shapes together.
Instead of seeing 40 unrelated keys, your eye sees one large artistic installation.
Copper also works beautifully in outdoor spaces because it complements:
- Green plants
- Terracotta pots
- Natural wood
- Stone pathways
- Brick walls
- Black metal furniture
- Rustic garden decorations
It adds warmth without looking too flashy.
Want to Make It Even More Creative?
Once you understand the basic idea, there are endless ways to personalize it.
Add Beads
Place wooden, glass, or metal beads above some of the keys.
Mix Metallic Colors
Instead of painting every key copper, try a combination of:
- Copper
- Gold
- Bronze
- Antique black
Add Small Charms
Attach tiny garden-themed charms between the keys.
Create an Ombre Effect
Paint the top keys darker and gradually use brighter shades toward the bottom.
Add a Centerpiece
Hang a larger antique-style key or decorative metal piece from the center.
Make It Seasonal
Add small decorations for different times of the year, such as dried flowers, wooden hearts, leaves, or miniature ornaments.
The project can easily change with the seasons without rebuilding the entire piece.
A Simple Idea with a Big Visual Impact
What makes this project so appealing is that it proves you do not need expensive supplies to create something memorable.
A forgotten collection of keys, a piece of wood, a roll of twine, and a can of spray paint can become an eye-catching piece of outdoor art.
The finished decoration has texture.
It has movement.
It reflects the sunlight.
And because every collection of keys and every piece of driftwood is different, no two finished projects will ever look exactly alike.
That is the real charm of DIY upcycling.
You are not simply making another decoration from a store-bought kit. You are taking ordinary objects with a past and giving them a completely unexpected future.
So before you throw away that old key that no longer opens anything, take another look.
With a little copper paint and some imagination, it might just become the most interesting thing hanging in your backyard.
Final Thought
This copper key and driftwood hanging decoration is proof that some of the best DIY projects begin with the things we usually ignore.
Those old keys may no longer unlock doors—but they can still open the door to a little creativity.
And with 40 shimmering copper keys dancing beneath a weathered piece of driftwood, your backyard may never look quite the same again.