Step-by-Step Build Guide
- Prep and Preserve the CharacterGive your salvaged drawer fronts a good scrub with warm, soapy water to remove years of dust. Once dry, lightly sand away any rough splinters or loose varnish. The goal here isn’t perfection—leave those minor dents, knot holes, and weathered wood grain intact to preserve that authentic vintage patina.
- Build the Upper Display BoxLine up your drawer fronts side by side. Place your top wood plank flat across the upper edge to create the top shelf. Secure the plank in place using wood glue and countersunk screws driven down through the top (or angled from behind) for a seamless look.
- Attach the Lower Hook BoardPosition your bottom backing plank directly beneath the drawer assembly. Align it flush with the back edge and fasten it securely using heavy-duty wood screws driven through the rear. This creates a solid foundation that can easily handle the weight of heavy winter coats.
- Install the Antique HardwareReattach the original drawer knobs right in the center of each drawer face to give the illusion of real miniature cubbies. Next, space your cast iron coat hooks evenly along the bottom plank. Mark your spots, pre-drill pilot holes to prevent splitting the aged wood, and screw the hooks firmly into place.
- Securely Mount Your MasterpieceBecause solid wood and heavy iron hardware carry some weight, safety is key. Attach two heavy-duty keyhole hangers to the top back corners of the unit. Use a level to mark your wall placement, and anchor the rack directly into wall studs (or use heavy-duty wall anchors) before hanging.
Styling Your New Entryway Hub
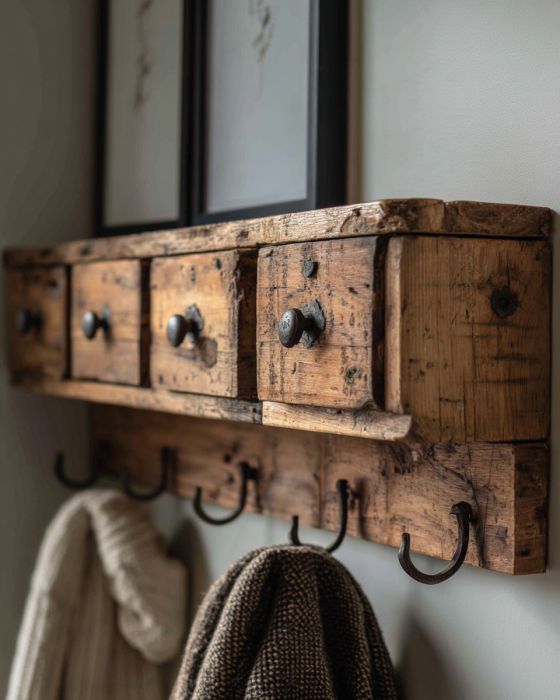
Once your rack is securely mounted, it’s time for the fun part:
- The Top Shelf: Style it with black-and-white family portraits in dark wood frames, small potted succulents, or a row of vintage hardcover books.
- The Coat Hooks: Use them for everyday essentials like wool scarves, tweed jackets, leather totes, or dog leashes.
Before you throw away that broken piece of furniture, turn it sideways. You might just create the favorite focal point of your entire home!
Pages: 1 2