Step 2: Sort and Inspect the Slats
Examine each slat for:
- Cracks
- Warping
- Stains
- Damage
Set aside damaged pieces.
Select the best slats for weaving.
If necessary, lightly sand rough edges for a smoother finish.
Step 3: Decide on Basket Size
Choose what your basket will be used for:
Small Basket
Ideal for:
- Keys
- Remote controls
- Craft supplies
Medium Basket
Perfect for:
- Towels
- Books
- Toys
Large Basket
Great for:
- Blankets
- Laundry
- Storage bins
Measure and sketch your desired dimensions before beginning.
Step 4: Cut the Slats to Length
Using scissors or a utility knife:
Cut slats according to your basket measurements.
You’ll need:
- Vertical strips
- Horizontal weaving strips
Cut extra pieces in case of mistakes.
Uniform lengths create a cleaner final appearance.
Step 5: Build the Basket Base
Lay several slats side by side horizontally.
Weave perpendicular slats through them:
- Over
- Under
- Over
- Under
Continue alternating until you create a flat woven square or rectangle.
This woven section becomes the basket bottom.
Use clips to hold everything in place while working.
Step 6: Fold the Side Walls Upward
Once the base is complete:
Carefully bend the outer slats upward to form the basket walls.
Because blind slats are flexible, they naturally curve into shape.
Take your time to avoid creasing the material too sharply.
Step 7: Weave the Side Panels
Begin weaving additional slats horizontally around the upright pieces.
Continue the over-under pattern.
As you build upward:
- Tighten loose sections
- Adjust spacing
- Keep walls even
The woven pattern gradually creates the beautiful basket texture.
Step 8: Secure the Corners
Corners require extra reinforcement.
You can secure them using:
- Hot glue
- Strong thread
- Zip ties
- Clear fishing line
Trim any excess material.
Neat corners give the basket a professional look.
Step 9: Finish the Top Edge
Fold the top ends inward or wrap an additional slat around the rim.
Secure the rim with:
- Glue
- Stitching
- Clips
This step strengthens the basket and creates a polished appearance.
Step 10: Add a Base Insert
For heavier items, add an insert made from:
- Cardboard
- Thin plywood
- Foam board
Cover the insert with fabric if desired.
This extra support increases the basket’s durability.
Step 11: Customize Your Basket
Personalize your creation with:
- Fabric liners
- Decorative labels
- Rope handles
- Painted finishes
- Leather straps
The possibilities are endless.
Every basket becomes one-of-a-kind.
Creative Uses for Your Basket
These woven baskets are incredibly versatile.
Use them for:
Living Room Storage
Store:
- Throws
- Magazines
- Remote controls
Bathroom Organization
Hold:
- Towels
- Toiletries
- Hair accessories
Craft Room Supplies
Organize:
- Yarn
- Fabric
- Paint brushes
Entryway Storage
Keep:
- Keys
- Gloves
Why Crafters Love This Project
This DIY project combines:
- Sustainability
- Creativity
- Functionality
- Affordability
Turning old blinds into elegant baskets gives materials a second life while creating beautiful home décor.
It’s the kind of project that surprises people because the finished basket looks nothing like its original source.
Common Mistakes to Avoid
Avoid these beginner errors:
- Using damaged slats
- Uneven weaving tension
- Weak corners
- Skipping base reinforcement
- Cutting inaccurate lengths
Careful measuring and patience produce the best results.
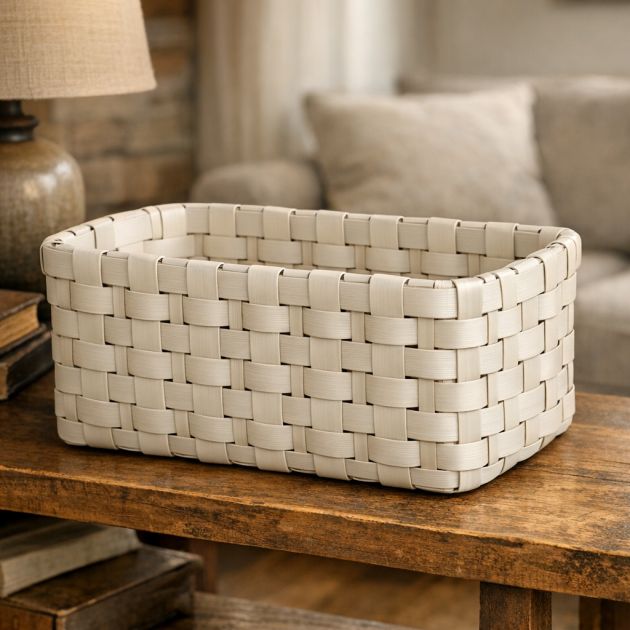
Final Reveal: From Window Covering to Designer Basket
At first glance, nobody would ever guess that this elegant woven basket began as a set of old venetian blinds. The smooth woven texture, clean lines, and sturdy construction make it look like something from a boutique home décor store.
What was once destined for the landfill has become a stylish storage solution that is both practical and beautiful. It’s no wonder everyone in her craft group is copying the idea.
This clever upcycling project proves that sometimes the best DIY creations aren’t made from expensive supplies—they’re hiding in the things we almost throw away.