Step 1: Clean Everything Thoroughly
Wash both planters and the pizza pan.
Remove:
- Dust
- Oils
- Manufacturing residue
- Dirt
Dry completely.
Wipe the surfaces with rubbing alcohol for maximum adhesive strength.
Step 2: Lightly Sand the Contact Areas
Use fine-grit sandpaper to rough up:
- The planter rims
- The underside of the pizza pan
This helps the glue bond much better.
Wipe away all sanding dust afterward.
Step 3: Position the Bottom Planter
Turn one planter upside down.
This becomes the base.
Make sure it sits level on the patio.
Step 4: Glue the Second Planter
Apply a thick bead of outdoor construction adhesive around the bottom planter.
Center the second planter on top.
The two planters should connect rim-to-rim, creating a pedestal shape.
Check from every angle to ensure everything is centered.
Step 5: Allow the Adhesive to Cure
Place a heavy object on top.
Leave it untouched according to the adhesive manufacturer’s instructions.
Usually:
- 24 hours minimum
- 48 hours for maximum strength
Patience here makes the table much sturdier.
Step 6: Attach the Pizza Pan
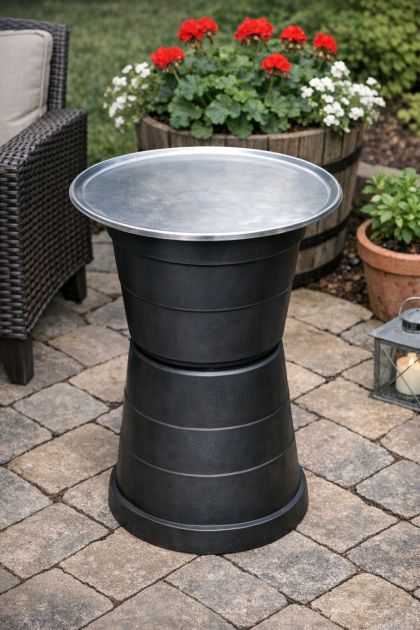
Apply adhesive around the top planter’s rim.
Carefully center the pizza pan.
Press down evenly.
Again, place something heavy on top while it cures.
Step 7: Paint (Optional)
If desired, spray paint the entire table.
Popular colors include:
- Matte black
- Satin bronze
- White
- Charcoal gray
- Navy blue
- Sage green
Allow each coat to dry before applying another.
Step 8: Seal for Outdoor Protection
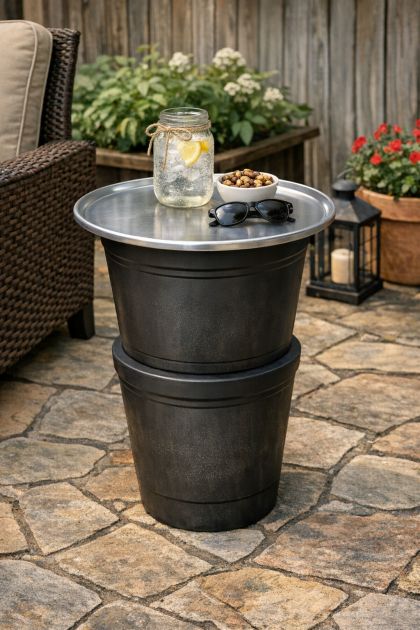
Although plastic won’t rust, adding a clear outdoor sealer helps protect:
- Paint
- Adhesive
- Metal tabletop
It also makes cleaning much easier.
Styling Ideas
Once finished, decorate your new table with:
- Mason jar lanterns
- Potted succulents
- Lemonade pitchers
- Outdoor candles
- Decorative stones
- Small flower arrangements
- Solar lanterns
- Garden statues
The possibilities are endless.
Where It Looks Best
This DIY table works beautifully on:
- Covered patios
- Garden seating areas
- Poolside lounges
- Apartment balconies
- Decks
- Front porches
- Outdoor reading corners
- Fire pit seating areas
Tips for a Professional Finish
✔ Measure carefully before gluing.
✔ Keep everything centered.
✔ Use high-quality outdoor adhesive.
✔ Spray multiple light coats instead of one heavy coat.
✔ Allow adequate drying time.
✔ Add felt pads underneath if placing it on delicate surfaces.
Creative Variations
Once you’ve mastered the basic version, try customizing it:
Rustic Style
Use bronze paint and add a faux stone finish.
Coastal Theme
Paint everything white with a weathered finish.
Modern Minimalist
Use matte black with a brushed steel tabletop.
Farmhouse
Add a wooden round tray on top of the pizza pan.
Luxury Look
Apply metallic gold or champagne spray paint.
Frequently Asked Questions
Is it sturdy enough for drinks?
Yes. When properly glued with construction adhesive, it’s sturdy enough for beverages, books, candles, and decorative items.
Can it stay outside?
Yes. Use outdoor-rated adhesive and paint, and it can remain outdoors year-round in most climates.
Can I use terracotta pots instead?
You can, but plastic planters are lighter and less likely to crack if moved.
Can I make it taller?
Absolutely. Use taller planters or larger decorative urns for a more dramatic look.
Final Thoughts
Sometimes the best DIY ideas come from seeing everyday objects in a new way. By combining two inexpensive plastic planters and a simple metal pizza pan, you can create a chic outdoor side table that looks surprisingly expensive.
Whether you’re entertaining guests, enjoying your morning coffee, or simply decorating your patio on a budget, this clever project adds style, function, and personality without requiring advanced DIY skills. It’s affordable, customizable, and easy enough to complete in an afternoon—making it no surprise that neighbors keep asking how you made it.