Step-by-Step Instructions
Step 1: Get the Dough Rolling
Start by creaming together the softened butter and granulated sugar until the mixture is light and fluffy. A handheld mixer or a stand mixer with the paddle attachment works best for this. Once creamed, mix in the vanilla extract.
Step 2: Dry Meets Wet
In a separate bowl, whisk together the all-purpose flour and salt. Gradually add the flour mixture to the butter-sugar mixture, mixing on low speed until just combined. Be careful not to overmix, as this can lead to a tougher cookie.
Step 3: Add the Festive Spark
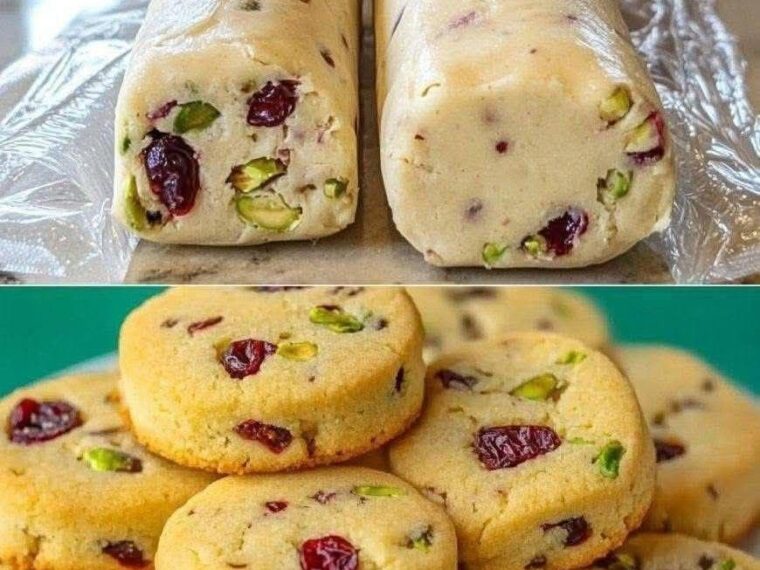
This is where the magic happens! Gently fold in the dried cranberries and chopped pistachios with a spatula. The goal is to evenly distribute them without breaking up the cranberries or over-processing the dough. The result should look similar to the raw dough logs in the top image.
Step 4: The Art of the Log
Now for the critical slice-and-bake step. Divide the dough into two roughly equal halves. On a clean, lightly floured surface, gently roll each half into a log shape, approximately 1.5 inches in diameter. Don’t stress too much about getting it perfectly round; the imperfections add character! Wrap each log tightly in plastic wrap, twisting the ends securely.
Step 5: Chill Out (This is Important!)
This step is non-negotiable! Chill the dough logs in the refrigerator for at least 2 hours, or even overnight. This allows the butter to re-solidify, ensuring the cookies keep their shape and don’t spread too much during baking.
Step 6: Slice and Bake!
Preheat your oven to 350°F (175°C) and line two large baking sheets with parchment paper or silicone baking mats.
Remove one log of dough from the refrigerator and unwrap it. Using a sharp knife, slice the log into rounds about ¼ to ½ inch thick. Place the cookie rounds on the prepared baking sheets, leaving about an inch of space between them.
Step 7: Into the Oven They Go
Bake the cookies for 10-12 minutes, or until the edges are just barely beginning to turn a light golden brown. Be sure to check them early, as overbaking can quickly make them too dry. Shortbread should remain pale and melt-in-your-mouth.
Step 8: Cool and Enjoy (and Repeat!)
Remove the baking sheets from the oven and let the cookies cool on the sheet for about 5 minutes before transferring them to a wire rack to cool completely. While the first batch cools, repeat the slicing and baking process with the second dough log.
Pro-Tips for Shortbread Success
- Soften Your Butter, But Not Too Much: The butter should be soft enough to cream easily but still cold to the touch. Avoid letting it get completely melty or oily.
- Don’t Be Afraid of a Little Texture: Rough-chopping the pistachios adds a satisfying crunch and visual appeal.
- Chill Time is Your Friend: The longer you chill the dough, the better the final texture and shape of your cookies will be. Consider making the dough a day or two in advance.
- A Sharp Knife is Key: Use a sharp, non-serrated knife for clean slices that won’t squish the dough or break the add-ins.
- Storage Savvy: These cookies store well in an airtight container at room temperature for up to a week. They can also be frozen for longer storage. The frozen dough logs also keep beautifully!
Why You’ll Love These Cookies
Aside from the incredible taste and texture, these Cranberry Pistachio Shortbread Cookies offer a unique combination of sweet, tart, and nutty flavors that’s perfectly balanced. They’re also:
- Stunningly Festive: Look at that red and green! They’re practically built for the holidays.
- Foolproofly Easy: The slice-and-bake method is inherently less stressful than traditional rolled cookies.
- Make-Ahead Friendly: You can make the dough logs days in advance, simplifying your holiday baking marathon.
This simple recipe proves that stunning holiday baking doesn’t have to be complicated. With just a few ingredients and a simple method, you can create a truly show-stopping treat that everyone will adore.
Now, fire up your oven, whip out that plastic wrap, and get ready for a deliciously effortless holiday baking experience. Enjoy!