
Step 2: Prepare the Work Area
Concrete projects can get messy.
Protect your workspace with:
- Plastic sheeting
- Cardboard
- Drop cloths
Wear gloves and work outdoors or in a well-ventilated area.
Step 3: Mix the Concrete
Prepare the concrete according to package instructions.
Aim for a consistency similar to:
- Thick pancake batter
- Yogurt
- Smooth mortar
Avoid making the mixture too watery, as it may slide off the ferns.
A slightly thicker mixture adheres better to delicate leaf structures.
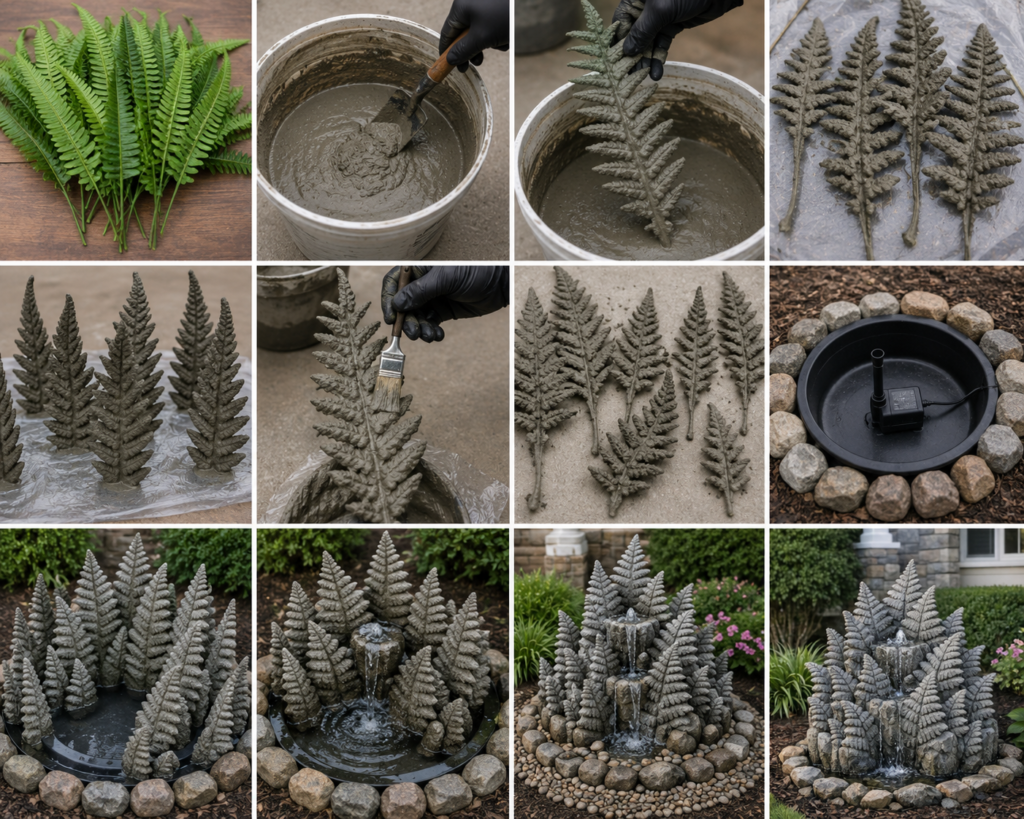
Step 4: Dip the Ferns into Concrete
Carefully dip each fern into the concrete mixture.
Rotate it gently to coat all surfaces.
Use your hands or a brush to ensure every leaf receives an even layer.
Shake off excess concrete while preserving the fern details.
This step is where the transformation begins.
Step 5: Shape the Ferns
While the concrete remains wet, bend the stems slightly into natural curves.
You can create:
- Upright fronds
- Arching shapes
- Fan-like arrangements
These variations make the finished display appear more organic and lifelike.
Step 6: Allow the First Layer to Dry
Lay the coated ferns on a flat surface or support them upright.
Allow them to dry for 12–24 hours.
As the concrete begins to harden, the fern shapes become surprisingly rigid and strong.
Step 7: Apply Additional Coats
For extra durability, apply a second or even third coat of concrete.
Each layer:
- Strengthens the structure
- Improves weather resistance
- Enhances texture
Allow drying time between coats.
The finished pieces should feel solid but not excessively heavy.
Step 8: Build the Fountain Base
Select a shallow waterproof basin or preformed pond liner.
Place it in the desired garden location.
Install the fountain pump according to the manufacturer’s instructions.
Hide the pump beneath decorative stones.
Step 9: Arrange the Concrete Fern Sculptures
Begin placing the hardened fern sculptures around the fountain.
Layer different heights and sizes to create depth.
Cluster them tightly for a lush, natural appearance.
This arrangement creates the illusion of stone plants emerging from flowing water.
Step 10: Add Rocks and Finishing Touches
Surround the base with:
- River stones
- Decorative gravel
- Mulch
- Large landscape rocks
The combination of concrete textures and natural materials creates a seamless garden feature.
Step 11: Seal the Concrete (Optional)
An outdoor concrete sealer can help protect the sculptures from:
- Moisture
- Frost damage
- Staining
- Weathering
A matte finish preserves the natural stone appearance.
Step 12: Turn on the Water Feature
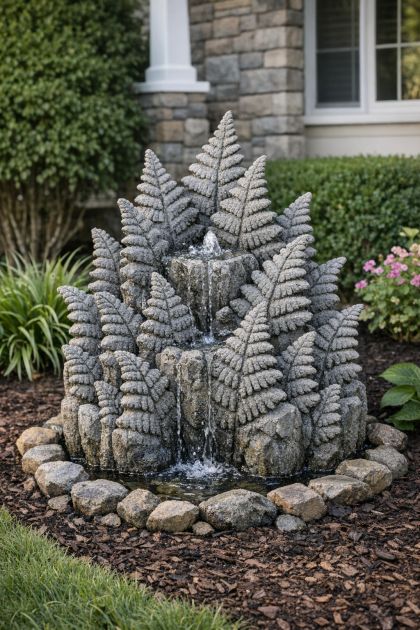
Once everything is in place, fill the basin with water and activate the pump.
As water trickles through the sculptural ferns, the entire feature comes to life.
The gentle sound of running water creates a relaxing atmosphere perfect for patios, entryways, and front gardens.
Styling Ideas for Different Garden Types
Cottage Garden
Surround the fountain with:
- Lavender
- Coneflowers
- Roses
- Salvia
Modern Landscape
Pair the fountain with:
- Black gravel
- Ornamental grasses
- Clean stone borders
Woodland Garden
Add:
- Hostas
- Moss
- Ferns
- Shade-loving perennials
The design adapts beautifully to almost any landscape style.
Common Mistakes to Avoid
Many first-time DIYers run into a few simple problems.
Avoid:
- Concrete that is too thin
- Using fragile plastic plants
- Skipping extra coats
- Poor pump placement
- Overcrowding the arrangement
Careful planning leads to a more professional result.
Why Everyone Is Copying This Front-Yard Idea
This project combines sculpture, water, and landscaping into one breathtaking feature. It looks far more expensive than it actually is and can dramatically increase curb appeal.
Neighbors often stop to admire the design because it feels both artistic and natural. The fossil-like ferns create visual interest during the day, while the flowing water adds movement and sound.
It’s the kind of DIY project that sparks conversations and inspires others to try it themselves.
Final Reveal: A Front Yard Worth Admiring
Imagine walking up to a home where stone-like fern sculptures rise gracefully from a bed of rocks as water gently cascades through them. The soft sound of flowing water fills the air while the textured concrete catches the sunlight, creating shadows and depth throughout the garden.
What began as inexpensive plastic ferns and a bag of concrete has become a stunning landscape centerpiece that looks professionally designed. Elegant, durable, and surprisingly easy to make, this DIY fountain proves that some of the best garden ideas start with the simplest materials—and a little creativity.