Step 1: Prepare the Wooden Pallet
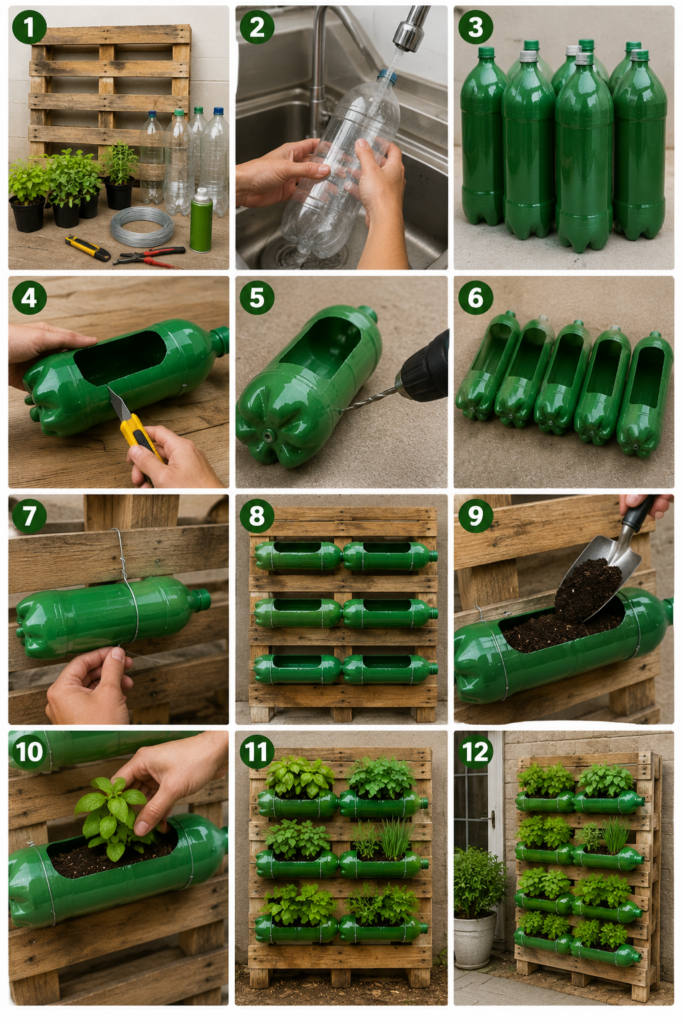
Start by choosing a sturdy wooden pallet in good condition.
Remove any loose nails and rough splinters.
Lightly sand the entire surface to create a smooth finish.
If desired, stain or seal the wood with an outdoor wood protector to help it withstand rain and sun.
Allow it to dry completely before moving to the next step.
Step 2: Clean the Plastic Bottles
Remove all labels from the soda bottles.
Wash them thoroughly with warm water and dish soap.
Allow them to dry completely.
Clean bottles help the paint adhere much better.
Step 3: Paint the Bottles
Spray each bottle with outdoor spray paint.
Green is popular because it blends naturally with plants, but you can choose black, white, terracotta, or any color that complements your patio.
Apply two light coats instead of one heavy coat to avoid drips.
Let the bottles dry according to the paint manufacturer’s instructions.
Step 4: Cut the Planting Openings
Using a utility knife, carefully cut a long rectangular opening along the side of each bottle.
This opening will become the planting pocket.
Leave enough plastic around the edges to keep the bottle strong.
For safety, smooth any sharp edges with sandpaper.
Step 5: Create Drainage Holes
Turn each bottle upside down.
Use a drill or a heated nail to make several small holes in the bottom.
These drainage holes prevent excess water from collecting and help protect plant roots from rot.
Step 6: Attach the Bottles to the Pallet
Arrange the bottles horizontally across the pallet.
Space them evenly to create clean rows.
Wrap galvanized wire securely around each bottle.
Thread the wire through the pallet slats and twist it tightly behind the pallet.
Each bottle should feel stable and should not move when gently shaken.
Step 7: Fill with Potting Mix
Add high-quality potting soil into each bottle.
Avoid using heavy garden soil, as it may not drain well in small containers.
Fill each planter about three-quarters full.
Step 8: Plant Your Herbs
Carefully remove each herb from its nursery pot.
Loosen the roots slightly.
Place the plant into the bottle and gently fill around it with additional soil.
Lightly press the soil into place without compacting it too much.
Step 9: Water Thoroughly
Water each planter slowly until water begins draining from the bottom holes.
This helps settle the soil around the roots.
For the first week, check moisture daily while the plants establish themselves.
Step 10: Display Your Vertical Garden
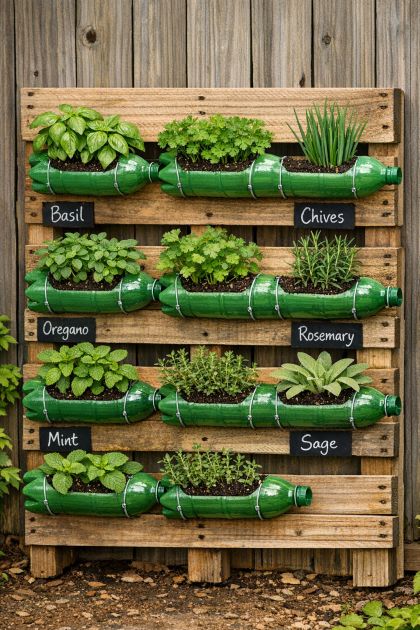
Lean the pallet against a wall or securely mount it to a fence.
Choose a location that receives the appropriate amount of sunlight for the plants you’ve selected.
Herbs generally perform best with six to eight hours of sunlight each day.
Care Tips
To keep your vertical garden looking beautiful:
- Water regularly, especially during hot weather.
- Trim herbs frequently to encourage fuller growth.
- Fertilize once a month with a balanced liquid fertilizer.
- Remove dead leaves as needed.
- Rotate the pallet occasionally if one side receives more sunlight.
Creative Variations
You can personalize this project in many ways:
- Paint each row a different color.
- Add chalkboard labels for every herb.
- Install small solar fairy lights around the pallet.
- Mix herbs with colorful flowers.
- Use recycled wine bottles for decorative accents.
- Add wheels to the bottom for a movable garden.
Why Everyone Loves This DIY
This project combines sustainability, creativity, and practicality in one simple build. It transforms everyday waste into an attractive vertical herb garden that saves space while adding personality to your outdoor living area.
Whether your porch is large or small, this inexpensive DIY creates a beautiful display that’s easy to maintain and provides fresh herbs just steps from your kitchen. It’s no surprise homeowners everywhere are recreating this clever idea and giving their front porches a fresh, welcoming look with little more than recycled bottles, a wooden pallet, and a bit of imagination.