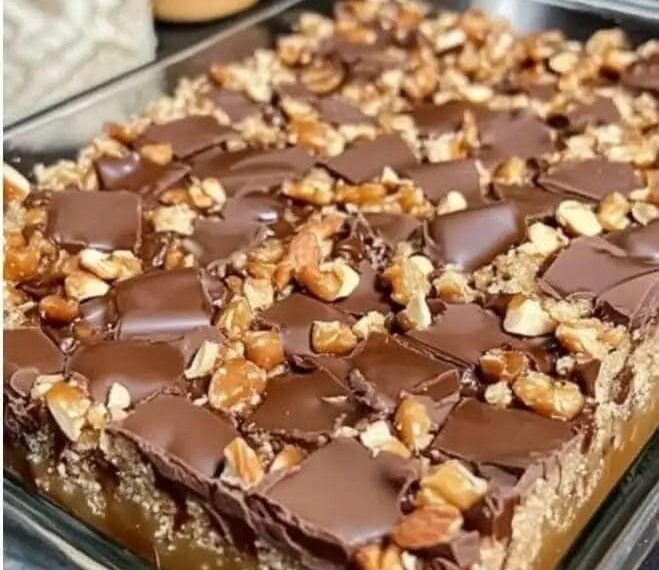
Step 1: Prepare the Crunchy Base
- Preheat your oven to 350°F (175°C).
- In a bowl, mix the crushed biscuits, melted butter, and brown sugar until well combined.
- Press the mixture firmly into a greased baking dish to form an even layer.
- Bake for 10 minutes, then let it cool while preparing the caramel.
Step 2: Make the Caramel Layer
- In a saucepan, combine butter, brown sugar, sweetened condensed milk, and golden syrup.
- Cook over medium heat, stirring constantly, until the mixture thickens and turns a golden-brown color (about 10–12 minutes).
- Pour the hot caramel evenly over the cooled base and let it set for about 30 minutes.
Step 3: Add the Chocolate Topping
- Melt the chocolate chips in a heatproof bowl over simmering water or in short bursts in the microwave.
- Spread the melted chocolate evenly over the caramel layer.
- Sprinkle chopped nuts generously on top.
- Allow the bars to cool completely, then refrigerate for at least 1 hour before cutting into squares.
🍬 Pro Tips for Perfection
- Salted caramel twist: Add a pinch of sea salt on top of the caramel layer before adding chocolate for a sophisticated sweet-salty flavor.
- Nut-free version: Replace nuts with crushed pretzels or puffed rice for added crunch.
- Extra shine: Add a small drizzle of melted white chocolate on top for decoration.
🥄 Serving Suggestions
These bars are best served slightly chilled so the layers hold together beautifully. Pair them with a cup of coffee or hot chocolate for a decadent afternoon treat. They also make a perfect edible gift — just wrap each bar in parchment paper and tie with a ribbon.
🌟 Why You’ll Love Them
- Easy to make with simple ingredients
- A crowd-pleaser for all ages
- Perfect balance of crunchy, creamy, and chocolaty textures
- Keeps well for up to a week in the fridge
In summary, Caramel Chocolate Crunch Bars are a dessert masterpiece — a harmony of textures and flavors that you can prepare with minimal effort but maximum satisfaction. Once you make them, they’ll quickly become a family favorite and a go-to recipe for every special occasion.
Pages: 1 2