Step-by-Step Instructions
Step 1: Prepare Your Materials
- Clean the cutting boards
- Wipe the candle holders
- Let everything dry
💡 This ensures strong adhesion later.
Step 2: Sand (Optional but Recommended)
- Lightly sand the boards
- Smooth rough edges
👉 This gives a more polished, professional look.
Step 3: Customize the Wood (Optional)
Want that high-end finish?
- Apply wood stain for a rustic look
- Or paint for a modern vibe
🎨 Popular styles:
- Dark walnut → farmhouse
- White → minimalist
- Natural → clean & organic
Let it dry completely.
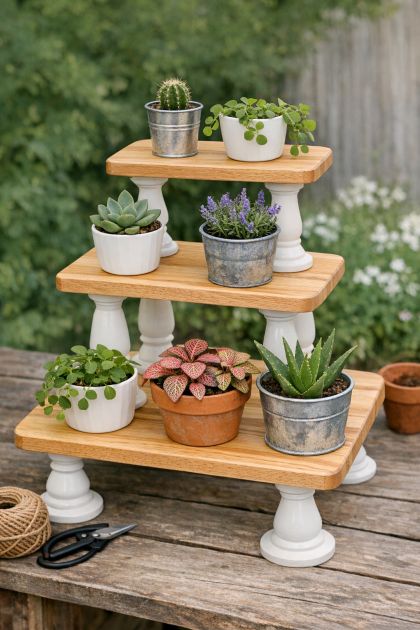
Step 4: Build the Base
- Take your bottom cutting board
- Apply strong glue to the center
- Attach the glass candle holder
Press firmly and hold for 30–60 seconds.
Step 5: Add the Second Tier
- Apply glue to the top of the candle holder
- Place the second cutting board on top
Make sure it’s centered.
Step 6: Add a Third Tier (Optional)
- Repeat the process:
- Glue another candle holder
- Add the top board
Now you have a beautiful multi-tier stand.
Step 7: Let It Cure
- Leave it undisturbed for several hours
- Overnight is best
⚠️ This step is key for durability.
Step 8: Style Your Stand
Now turn it into the beautiful piece you imagined:
☕ Coffee Bar Setup
- Cups, sugar jars, coffee pods
🕯️ Cozy Decor
- Candles, small plants, books
🍪 Serving Stand
- Pastries, snacks, fruit
🌿 Farmhouse Style
- Beads, mini signs, greenery
Final Result: Looks Expensive, Costs Almost Nothing
You end up with:
✨ A stylish tiered tray
✨ A functional organizer
✨ A Pinterest-worthy décor piece
And most people won’t believe it came from the dollar store.
Pro Styling Tips
- Stick to neutral colors for a luxury look
- Mix textures (wood + glass + greenery)
- Don’t overcrowd—keep it clean
- Change décor seasonally
Why This DIY Works So Well
- ✔ Super cheap (under $15–$25 total)
- ✔ Beginner-friendly
- ✔ Customizable
- ✔ Perfect for content creation
- ✔ High perceived value
Final Thought
This DIY proves something simple but powerful:
👉 You don’t need expensive décor to create a beautiful home.
👉 You just need creativity and a few smart ideas.
From basic cutting boards to a designer-style centerpiece—that’s the magic of DIY.
Pages: 1 2