Step-by-Step Instructions
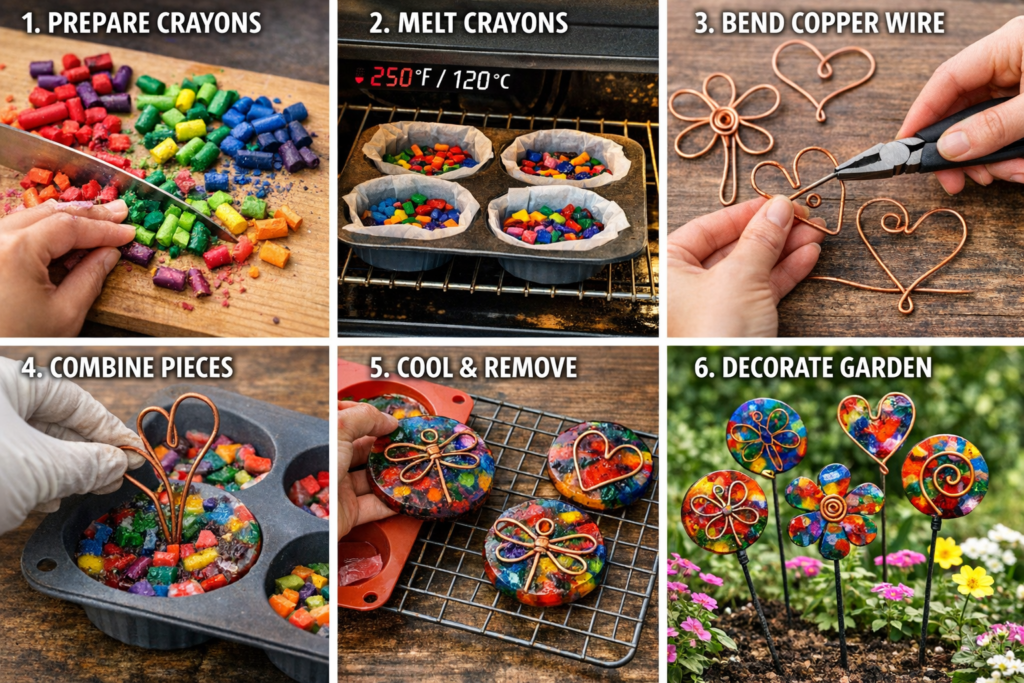
Step 1 – Prepare the Crayons
Remove the paper from the broken crayons and cut them into small pieces. Mixing different colors will create a beautiful stained-glass effect when melted.
Step 2 – Prepare the Mold
Place baking paper inside your mold so the melted wax doesn’t stick. Then place the crayon pieces inside the mold.
Step 3 – Melt the Crayons
Put the mold in the oven at about 120°C (250°F) for 10–15 minutes until the crayons are fully melted.
Important: Always supervise this step and never leave the oven unattended.
Step 4 – Shape the Copper Wire
While the crayons are melting, use copper wire to create shapes like:
- Flowers
- Butterflies
- Hearts
- Spirals
- Dragonflies
Use pliers to bend the wire easily.
Step 5 – Combine the Two Parts
Once the melted crayons cool slightly but are still soft, insert the copper wire into the wax so it holds when it hardens.
Let everything cool completely for about 30–60 minutes.
Step 6 – Decorate Your Front Yard
Once hardened, place your colorful decorations in flower pots, garden beds, or along a walkway. When sunlight hits them, they look absolutely stunning.
Where to Use These Decorations
These DIY decorations look beautiful in:
- Flower beds
- Plant pots
- Front yard pathways
- Garden fences
- Balcony planters
They also make great handmade gifts.
Tips for Best Results
- Use bright colors for a stained-glass effect
- Don’t overheat the crayons
- Use thick copper wire so it stands firmly
- Try different mold shapes (circles, hearts, flowers)
If you don’t already have the materials, many people use silicone baking molds and craft wire kits from Amazon because they are inexpensive and easy to use.
(Another natural affiliate placement.)
Why People Love This DIY Project
This project became viral because it is:
- Cheap
- Easy
- Eco-friendly
- Beautiful
- Perfect for recycling broken crayons
It’s a perfect weekend DIY project that can completely transform how your front yard looks without spending a lot of money.