Step-by-Step Guide
Step 1: Hunt for Unique Plates
Visit thrift stores, flea markets, or garage sales. Look for plates with interesting shapes, patterns, or textures—even if they don’t match.
Tip: Don’t worry about color differences. That’s part of the charm!
Step 2: Clean and Prepare
Wash all the plates thoroughly and let them dry. This ensures better adhesion and a cleaner final look.
Step 3: Plan Your Design
Before gluing anything, arrange the plates on a flat surface. Experiment with different layouts:
- Stacked centerpiece
- Tiered stand
- Wall art arrangement
Take a photo once you’re happy with the design.
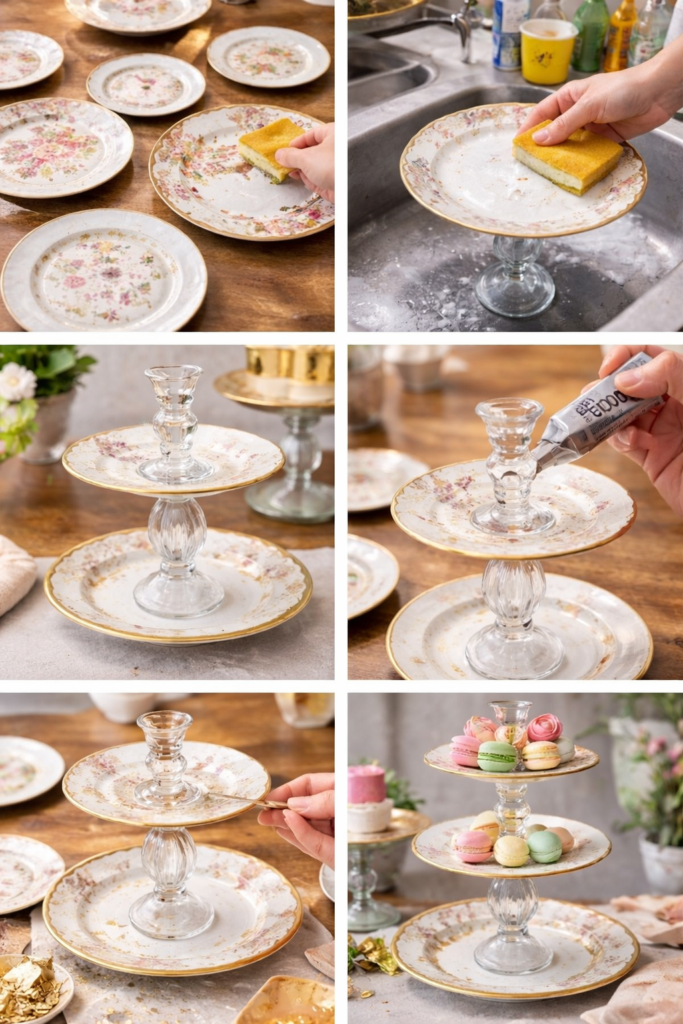
Step 4: Assemble the Pieces
Use strong adhesive to glue the plates together. You can stack them to create:
- A cake stand
- A decorative tower
- A centerpiece
Let the glue dry completely according to the instructions.
Step 5: Customize Your Creation
Now comes the magic touch! You can:
- Paint the plates in one color for a modern look
- Add gold edges for elegance
- Keep the original patterns for a vintage vibe
Step 6: Seal and Protect
Apply a clear sealant to protect your design and give it a polished finish.
Creative Ideas You’ll Love
1. Tiered Dessert Stand
Stack plates of different sizes to create a beautiful stand for cakes, cupcakes, or fruit.
2. Wall Art Display
Hang the plates on a wall in a creative arrangement for a unique gallery look.
3. Jewelry Organizer
Use smaller plates to hold rings, earrings, and accessories.
4. Garden Decoration
Turn your creation into an outdoor decorative piece.
Why This Project Feels Like a Dream
What makes this DIY so special is the transformation. You start with random, forgotten items and end up with something elegant, cohesive, and truly unique.
It’s not just about decoration—it’s about creativity, sustainability, and seeing beauty where others don’t.
SEO Keywords to Target
(For better ranking, naturally include these keywords in your blog or post)
- DIY thrift store decor
- upcycled plate ideas
- mismatched plates DIY
- budget home decor ideas
- creative recycling projects
- vintage plate crafts
- DIY tiered tray from plates
Pro Tips for Best Results
- Use plates with different heights for more dimension
- Let glue dry fully before moving
- Mix textures (ceramic, glass, patterned)
- Keep a consistent color palette if painting
Conclusion
This dreamy DIY project proves that creativity can turn the simplest items into something extraordinary. With just a few thrift store plates and a bit of imagination, you can create décor that looks expensive, elegant, and completely unique.
So next time you see mismatched plates at a thrift store, don’t ignore them—you might just be looking at your next masterpiece.