🌱 Introduction
Imagine harvesting fresh vegetables, herbs, and even fruits in the middle of winter without expensive heating systems. That’s exactly what a Walipini greenhouse offers. This underground greenhouse design uses the earth’s natural insulation and passive solar heating to create a stable, warm growing environment throughout the year.
The Walipini concept originated in Bolivia, where farmers needed a cost-effective way to grow crops in cold, high-altitude regions. Today, it’s gaining popularity worldwide among gardeners and homesteaders.
🌍 Why Build a Walipini?
Unlike traditional above-ground greenhouses, a Walipini is built into the ground, typically 6–8 feet deep, with a transparent roof angled toward the sun.
Main Benefits:
- Year-round growth — even in freezing climates.
- Energy savings — minimal heating required.
- Protection from wind, hail, and snow.
- Durability — long-lasting structure with low maintenance.
- Sustainability — reduced carbon footprint compared to heated greenhouses.
📐 Step-by-Step Guide to Building a Walipini
1. Choose the Right Location
- Pick a sunny spot, ideally facing true south in the Northern Hemisphere (true north in the Southern Hemisphere).
- Avoid areas prone to flooding.
- Make sure the ground is stable and well-drained.
2. Plan the Size and Depth
- Most Walipinis are 6–8 feet deep.
- Size depends on your growing goals — small for personal use, larger for market gardening.
- Keep in mind the deeper you dig, the more stable the temperature.
3. Excavate the Site
- Dig a rectangular pit to your chosen depth.
- Slope the walls slightly to prevent collapse.
- Remove large rocks and roots.
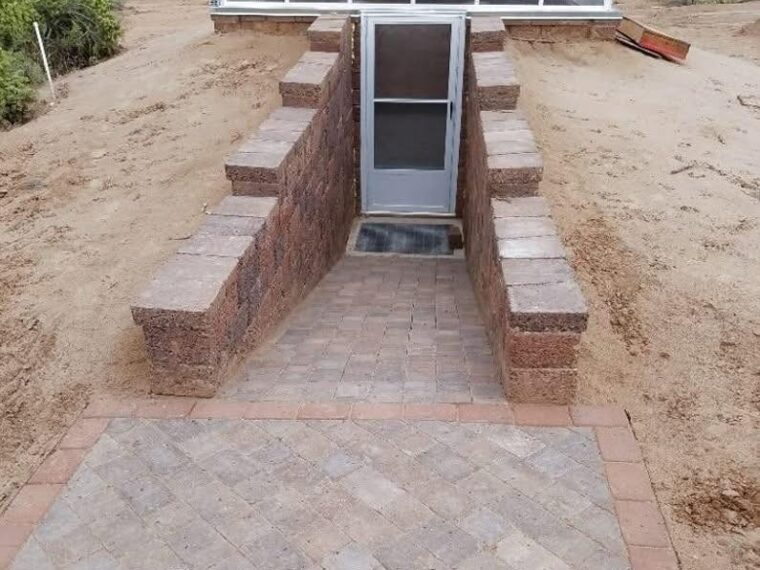
4. Build the Walls
- Use concrete blocks, bricks, or rammed earth for stability.
- The walls act as a thermal mass, storing heat during the day and releasing it at night.
- Insulate the north wall for extra warmth in winter.
5. Install the Floor
- Lay gravel for drainage, topped with paving stones or compacted soil.
- You can also incorporate raised garden beds inside for easier planting.
6. Design the Roof
- The roof should be transparent polycarbonate panels or heavy-duty greenhouse plastic.
- Angle it toward the sun (about 30–45°) for maximum light exposure.
- Include a ventilation window or vent at the top to regulate temperature.
7. Add the Entrance
- Build a sturdy, insulated door at one end.
- Create a small entryway to reduce heat loss when opening the door.
8. Manage Ventilation and Irrigation
- Install vents or fans for airflow in summer.
- Use drip irrigation or soaker hoses for consistent watering.
- Consider adding a rainwater collection system.
🌡 How a Walipini Works
The Walipini maintains warmth thanks to:
- Earth insulation — underground temperatures remain more stable than surface temperatures.
- Solar heat — sunlight enters through the angled roof and warms the soil and air.
- Thermal mass — walls and floor store heat and release it slowly at night.
📊 Scientific Backing
- According to a study by the University of Wyoming, Walipinis can maintain temperatures up to 20–30°F warmer than outside air in winter.
- Data from Permaculture Research Institute shows that crops like lettuce, spinach, and kale can thrive year-round in a Walipini without supplemental heating.
🌿 Best Crops to Grow in a Walipini
TO CONTINUE READING THE ARTICLE PLEASE SEE PAGE 2