Step 1: Prepare Your Pan
Line a square or rectangular pan with parchment paper, leaving extra over the sides for easy removal later.
Step 2: Melt the Chocolate
Gently melt the chocolate using:
- A saucepan over low heat, stirring constantly, or
- A microwave in short bursts, stirring between each interval
Add butter or coconut oil if using, and stir until completely smooth and glossy.
Step 3: Add the Crunch
Remove from heat and immediately fold in your chosen crunchy ingredient. Mix gently but thoroughly so every piece is coated in chocolate.
Step 4: Spread and Level
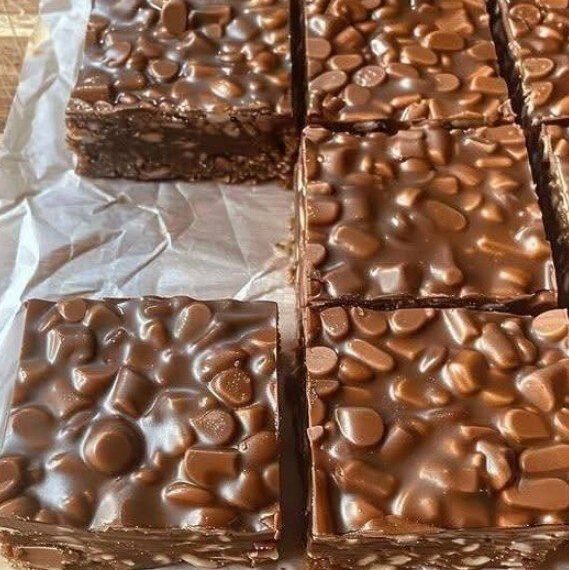
Pour the mixture into the prepared pan. Use a spatula or the back of a spoon to press it down firmly and smooth the top, just like the neat, flat surface seen in the image.
Step 5: Chill and Set
Place the pan in the refrigerator for 1–2 hours, or until fully set and firm.
Step 6: Slice and Serve
Lift the slab out using the parchment paper and cut into squares or rectangles with a sharp knife.
Tips for Perfect Crunch Bars
- Don’t overheat the chocolate – Gentle heat prevents grainy texture.
- Press firmly into the pan – This helps the bars hold together when sliced.
- Use a warm knife for clean cuts – Dip the knife in hot water and wipe dry before slicing.
- Let them fully set – Cutting too early can cause crumbling.
Delicious Variations to Try
Once you master the classic version, you can easily experiment:
- Peanut Crunch Bars
Add roasted peanuts or peanut butter for extra flavor and protein. - Caramel Crunch Bars
Swirl in caramel sauce before chilling. - Dark Chocolate & Sea Salt
Sprinkle flaky sea salt on top for a gourmet finish. - Healthier Version
Use dark chocolate, puffed quinoa, and natural sweeteners like honey or dates.
Storage and Shelf Life
- Store crunch bars in an airtight container in the refrigerator for up to 7 days.
- They can also be frozen for longer storage—simply thaw slightly before serving.
Final Thoughts
Classic homemade crunch bars prove that you don’t need baking or fancy techniques to create an impressive dessert. The image perfectly reflects what makes these treats so loved: thick layers, glossy chocolate, and a visible crunch that promises texture in every bite.
Whether you’re making them for a family gathering, a quick snack, or simply to satisfy a chocolate craving, these no-bake crunch bars are a timeless recipe that never disappoints—simple, customizable, and irresistibly delicious. 🍫✨